How to Organize Cross Stitch - Embroidery Floss - Easy Storage Solutions
Posted by Tracey Kramer on 12th Mar 2016
There are many cross stitch floss storage systems out there to choose from. Your goal is to find the best floss inventory system that works best for you. It should make your cross stitch floss easily accessible and provide the best organization which will increase your efficiency in completing your cross stitch projects. In other words, the more organized your floss storage is, the faster you will be able to complete your projects. I have divided floss storage into two categories: (1) Project Storage and (2) Stash Storage.
Project Storage: Project storage simply means using a small storage system that contains cross stitch floss just for that specific cross stitch project. In my early stitching days, I started out using Sudberry House floss sticks to organize my floss. (This may have been good for storing wool for needlepoint projects, but it was not good for storing floss because the floss easily became frayed and tangled). Also, the floss sticks did not keep my floss clean. So I ditched that method and purchased an expensive binder system where floss was kept in the skein, but squeezed into plastic or clear vinyl slots making it hard to put in and remove from each slot. This method also flattened and distorted the volume of the floss and gave it the appearance of being thin and flat. You don’t want this. Your floss should look plump and healthy, not smashed and defeated.
Next, I decided to use small plastic bags attached to a metal ring. I took my Sharpie marker and labeled each bag separating the floss into groups of hundreds and thousands (for instance, 100′s, 200′s, 3,00′s, 3,000, etc.), but this became too tedious, and with constant going in and out of the bags, two problems occurred: (1) the labeling on the bag wore off, even with a permanent marker, and (2) the DMC label often slipped off the floss skein, and when this occurs, you will have a mess on your hands trying to figure out which skein the label belongs to. This can become a major pain in the patoot, especially if this happens to more than one skein in the bag.
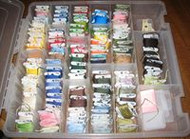
Now, I’m pleased to say I have reached the golden Himalayas and have found a full proof method that I have been using ever since called “the project box.” This is simply a small storage box with a lid that has dividers in it where you wind your DMC floss onto DMC Plastic bobbins and label them. This system is more compact, keeps your floss organized, and most of all, keeps your floss clean. In this box I place all of the floss required to complete my project. Sometimes, depending on the size of the project, I will need two boxes for one project, especially if there are a lot of colors involved.
Stash Storage: As far as having a storage system for the stashing of floss (i.e. extra floss you are holding for future projects), you can use a larger version of the small project box. These boxes are large flat square boxes that have a lid with closure clamps and come with removable dividers so that you can customize the cataloging of your colors within the box. These storage systems are stackable, and are also made to fit inside a cabinet. I don’t have a cabinet at this particular time, so mine are being stored in a stack on top of my coffee table for now.
The Ultimate Floss Storage System for Designers and/or Amateurs : This is the MacDaddy of all stash storage units! Last, but not least, I got this idea while strolling through a hardware store in the nuts and bolts aisle. I was looking at Stack-on’s 60-drawer storage cabinet guys use to sort out their nails and screws and other small hardware when I came across a nifty cabinet used for this purpose. It had multiple drawers which seemed would fit the length of a DMC floss skein. I also noticed these cabinets were mountable which I could someday mount on my walls for ease of filing. I became fascinated with the idea of using these cabinets to sort my floss, so I purchased two of them to start out. I labeled each drawer with large numbered stickers I printed on my printer and placed them in numerical order on the outside of each drawer, and placed each floss skein in them laying them flat. This worked out so well, that I went and purchased enough of these cabinets to complete the entire DMC range. It took 8 cabinets to accomplish this, and works out very well as my floss stays clean and is organized and ready for immediate use.
No matter what floss storage solutions you choose, make sure it works best for you. Always keep in mind the following equation: EA + O = HE (easy access + organization = high efficiency) and you can’t go wrong with that equation!

